
DBP52: Havoc in Creation | DBP_52.WAD
Doomer Boards

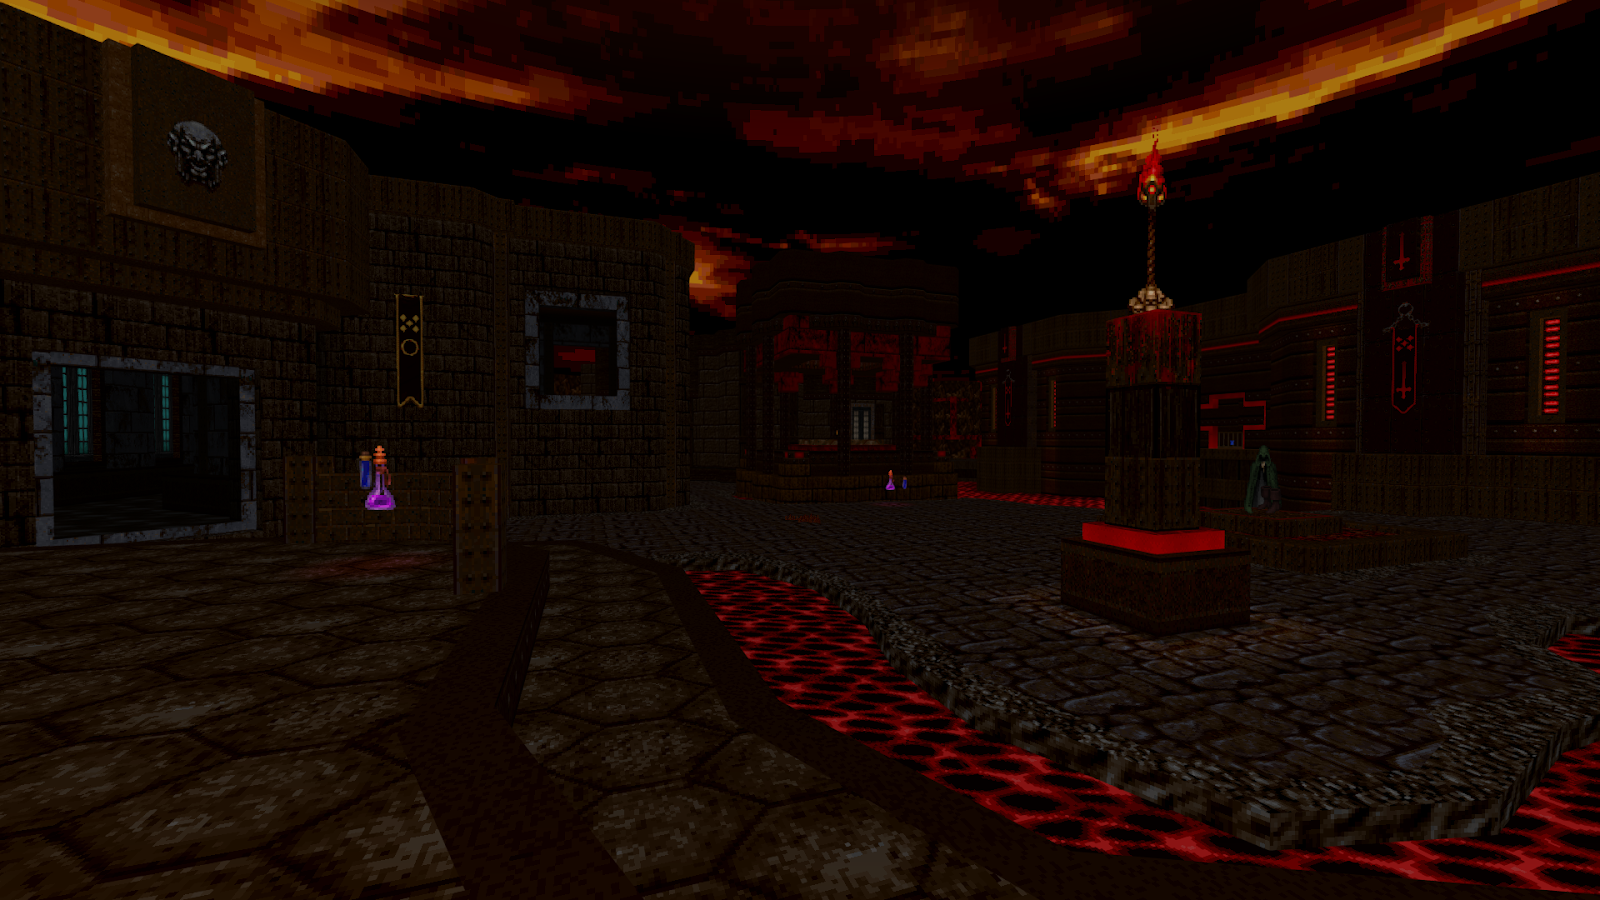
While the Doomer Boards Projects often relies on well-worn themes, they’ve developed a reputation for giving old themes a fresh spin. Making use of palette hacks for a different atmosphere can go a long way, and Havoc in Creation makes excellent use of one that throws the game into deep reds and cyans. While the textures are yet another GothicDM-derived set, they blend well with the new palette, giving the game a dark, moody, even apocalyptic feel. This jibes perfectly with the wad’s plot, told through runes that you must translate (composed through clever use of texture offsets and the standard Doom font.) The basic idea is that you are in what’s left of a once-verdant kingdom that was overtaken by demons, and the runes are the last messages of the survivors.


You should absolutely play Havoc in Creation. It’s one of the best-looking wads from a year full of great-looking wads, plays great, and blends creative ideas with tried-and-true tricks and traps for one of the Doomer Boards’ most solid mapsets.

 MAP01: Breaking Point
Jon "40oz" Vail
Yet another solid 40oz opener, it introduces you to the theme right away.
It's mostly imps you'll be dealing with as you try to work your way to the
yellow skull key in plain sight, but once you grab it, the nearby rock wall
collapses and a mess of baddies including revenants come to deal with you
for the map's finale fight. Finding the secrets was pretty fun.
 MAP02: Havoc I
BiZ, 40oz and matador
A short intermission map of sorts, very light on combat. The core of the
map is built around a jumping puzzle, with the ultimate goal being to reach
the blue skull key, which in this map acts as a device to allow you to read
the mysterious foreign script that tell the story of the mapset. It's a
gorgeous map that makes full use of the wad's new color palette, and the
little campsite out front is a nice touch.
 MAP03: Infernobox
Saltator
A pretty small map with just three rooms, but they all present their own
challenges, from the revenants pouring into the intro room once you kick
things off to the immediate next room being full of nasties, to the biggest,
open air area playing host to more revenants and then a second wave of
bullshit once you've opened the exit. That BFG off in the distance is
tantalizing, but you can't get to it...
 MAP04: Assault on Demon Fortress
CittyKat112
A very linear map that's mostly a series of setpiece fights. It's
nice-looking, but there isn't really a whole lot in the way of backtracking,
with combat being the primary focus. In terms of vanilla play it can be a
rough ride especially on pistol start, but it's eminently doable as long as
you're careful. Honestly, while combat puzzles are fun I would have
preferred a bit more non-linearity.
 MAP05: Misery Ridge
40oz
A pretty straightforward combat map that aesthetically reminds me of
"Inferno of Blood" from No Rest for the Living. Most of it is a small to medium-sized open space, but be prepared for a
nasty ambush in the first cavern you enter. The yellow key triggers a pretty
big rush of mostly imps, but I wouldn't consider that a setpiece fight.
That designation goes to the final showdown in a red-brick temple you
teleport to, but you're given ample room to maneuver. Fun map.
 MAP06: Havoc II
BiZ and 40oz
Another intermission map with a fairly low monster count, "Havoc II"
involves another puzzle setpiece where you're jumping around the ruins of a
castle and pressing switches as you try to find your way into another study,
where the red key will translate the runes by the exit for you. It's another
showcase for the wad's aesthetic, an atmospheric, quiet moment in what's
otherwise a relatively action-packed episode.
 MAP07: Inferno Dance
BearInThaWoods
Despite the hellish environs, lava has rarely been much of a threat so far
in this episode. Welcome to "Inferno Dance," an action-packed map with lots
of lava to dance over. The opening area has you running on narrow pathways
as lost souls and imps harass you, but you're not done with the balancing
act yet as a major part of the map has you running over a grid of small
columns towering over lava. Lots of combat, including some big crowds
towards the end. Fun map.
 MAP08: Apophis
E.M.
Hot on the heels of "Inferno Dance" is another lava-centric map, though
this one is more compact than the previous map, taking place in a single
open space with a bunch of structures surrounding a central pagoda. Make use
of the radsuits because you're gonna be running around a lot killing the
several dozen enemies all raining shit on you, with the most annoying ones
being the revenants hanging out on the outer rock walls. The red key trap by
comparison is pretty forgiving. I like that when you throw the switch near
the exit button it raises a bunch of platforms for you to explore the map
with, it's a nice touch.
 MAP09: Calefactor
shibainumaster
The heat gets turned up in this map set around a lava river. Lots of fire
coming at you from across the way, shibainumaster focusing mostly on leaving
the player exposed and forced to carve out a safe zone from which to tackle
the distant artillery. About halfway through you head into a large cavern,
and it's a different kind of exposure in that you drop into a dark chamber
that's full of enemy, with lots of corners and pillars for them to filter
around, making it hard to do crowd control. Fun, tough level with a few
surprises.
 MAP10: Crossing Worlds
40oz and sonny666
I'm a fan of sonny666 since I played "Norwich Lane" in
Morbid Autumn, and he and 40oz have crafted a fantastic eldritch adventure. You start
off going through an intimidating "council room" of sorts with archies
looking down at you before teleporting to a sort of nexus that leads to five
different combat zones, each one having its own setup. Finish them all and
you get to deal with a big nasty back in the nexus, and that's on top of
having to clear out more and more of the council and their goons every time
you swing through their chamber. It's a really great setup with a fantastic
look.
 MAP11: Havoc III
BiZ
BiZ presents us with a rather compelling finale. Now, full confession, I had somewhat differing results than a vanilla player would -- something about Walpurgis and Merciless Monsters combined had a way of breaking the effect of hordes of corpses teleporting in (and I'm not sure the arch-vile replacements actually resurrect anything anyway.) It makes for a very different kind of map where instead of dealing with a bunch of archies resurrecting all the monsters laying around, you face off against the pathetic last vestiges of whatever horrible force overwhelmed this once-verdant kingdom in their cavernous central library. Where the map really stands out, though, is the conclusion of the story the wad is trying to tell, culminating in a choice you have to make. It's really worth seeing for yourself.
 MAP12: Havoc in Creation
40oz
It's time to put an end to this. Whiff out the candle and the evil is destroyed, leaving you to make your exit through an eerie cavern to the mournful tune of "R7" from Shin Megami Tensei IV, with walls collapsing to reveal the team members' names. Cool credits map.
-june<3
And as the screams subsideI slowly raise my head
To watch the final ruin
And see my kingdom's end
The Doomer Boards Projects
| DBP01 | DBP02 | DBP03 | DBP04 | DBP05 | DBP06 |
| DBP07 | DBP08 | DBP09 | DBP10 | DBP11 | DBP12 |
| DBP13 | DBP14 | DBP15 | DBP16 | DBP17 | DBP18 |
| DBP19 | DBP20 | DBP21 | DBP22 | DBP23 | DBP24 |
| DBP25 | DBP26 | DBP27 | DBP28 | DBP29 | DBP30 |
| DBP31 | DBP32 | DBP33 | DBP34 | DBP35 | DBP36 |
| DBP37 | DBP38 | DBP39 | DBP40 | DBP41 | DBP42 |
| DBP43 | DBP44 | DBP45 | DBP46 | DBP47 | DBP48 |
| DBP49 | DBP50 | DBP51 | DBP52 | DBP53 | DBP54 |
| DBP55 | DBP56 | DBP57 | DBP58 | DBP59 | DBP60 |
| DBP61 | DBP62 | DBP63 | DBP64 | DBP65 | DBP66 |
| DBP67 | DBP68 | DBP69 | DBP70 | DBP71 | DBP72 |
| DBP73 | DBP74 | DBP75 | DBP76 | DBP77 | DBP78 |
| DBP79 | DBP80 | DBP81 | DBP82 | DBP83 | DBP84 |
| DBP85 | DBP86 | DBP87 | DBP88 | DBP89 | DBP90 |


No comments:
Post a Comment